First things first
A repository, also known as repo is nothing but collection of source code. It allows you to save versions of your code, which you can access when needed.
Setting up a repository
Initializing a new repository: git init
git init command allows us to create a new repo. It is a one-time command we use during initial setup of a new repo. It creates .git sub directory in your current working directory. It will also create a new master branch.
Git init with an existing project
To create a repo within an existing project folder, we first have to ‘cd’ to the root project folder and then execute git init command.
cd /path/to/your/existing/code
git init
Cloning an existing repository: git clone
If a project is already been setup in a remote central repository, git clone command helps users to obtain remote project copy into local environment. Like git init, git clone is generally a one-time operation. Once a developer has obtained a working copy, all git operations are managed through their local repository.
git clone <repo url>
‘git clone’ is used to create a copy or clone of remote repositories. You pass git clone a repository URL.
Git workflow
There are four core elements in the git workflow: Working Directory, Staging Area, Local Repository and Remote Repository
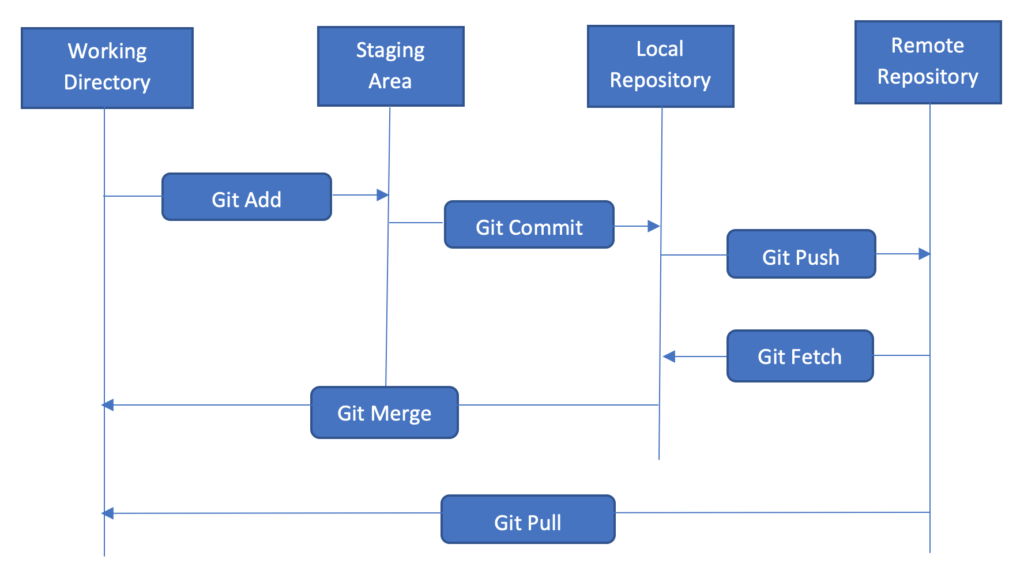
A file in a working directory can be in one of the following states:
- Staged: File with the updated changes is marked to be committed to the local repository but not yet committed.
- Modified: File with the updated changes is not yet stored in the local repository.
- Committed: Updated changes made into a file are safely stored in the local repository.
Git basic terminologies
- git add: A git command used to add a file from working directory to the staging area.
- git commit: A git command used to add all files that are staged to the local repository.
- git push: A git command used to add all committed files in the local repository to the remote repository.
- git fetch: A git command used to get files from remote repository to the local repository but not into the working directory.
- git merge: A git command used to get files from local repository into the working directory.
- git pull: A git command used to get files from remote repository directly into the working directory. It is equivalent to git fetch and git merge.
Placing a file under git
We are going to place a file under git without any GUI application. Keep ready your file which you want to place under version control. You can create a sample folder and place some files inside it.
Step 1 : Make a GitHub account. You can use this link : https://github.com/join?force_isolation=true
Step 2 : Make sure you have git installed on your machine. (Refer 1st article on Introduction to GIT)
Step 3 : Tell git who you are.
$ git config --global user.name "YOUR_USERNAME" $ git config --global user.email "your email address" $ git config --global --list # To check the info you just providedStep 4 : Let’s Git
· Create a new repository on GitHub.
· Locate the folder which you want to place under git in your terminal
$ cd Desktop/Git-Basics· Initialize Git and place a file under git
$ touch readme.md $ git init· Add all files to the staging area for commit
   $ git add .

   //This adds all the files from local repository in which changes were made and stages them for commit
· To add specific file
$ git add readme.md· To see what files are staged before we commit
$ git status //Lists all new or modified files to be committed· Commit changes
  $ git commit -m “your-commit-message”

  //The commit-message is given so that the other users can read the message and see what changes you made
· Un-commit changes (if required)
$ git reset HEAD~1 //Remove the most recent commit· Now each time we make changes in your files and save it, it won’t be automatically updated on GitHub. All the changes made to the files are updated in the local repository. Now let’s update the changes to the master branch.
   $ git remote add origin remote_repository_URL

   //Sets the new remote
   $ git push -u origin master

   //This ‘git push’ command pushes the changes from your local repository to the remote repository you specified as the origin.
· View commit history
$ git logStep 5 : Collaborating
· When you with your team on a project, each time you make some changes, and push those into master/remote repo, your colleague must pull the changes that you have already pushed into the remote repo. This is just to make sure you are working on the latest version of the git repo each time you start working, a git pull command is the way to go.
$ git pull origin master· Two more useful git commands
$ git fetch $ git merge When you do ‘git fetch’ the Git gathers any commits from the target branch that do not exist in your current branch and stores them in your local repository. However, it does not merge them with your current branch. This is particularly useful if you need to keep your repository up to date, but are working on something that might break if you update your files. To integrate the commits into your master branch, you use git merge.
I’m usually to blogging and i actually recognize your content. The article has really peaks my interest. I am going to bookmark your web site and keep checking for brand new information.
Somebody essentially help to make seriously articles I would state. This is the first time I frequented your web page and thus far? I amazed with the research you made to create this particular publish incredible. Excellent job!
The articles you write help me a lot and I like the topic
Thank you for your help and this post. It’s been great.
Thank you for writing such an excellent article, it helped me out a lot and I love studying this topic.
Thank you for posting this. I really enjoyed reading it, especially because it addressed my question. It helped me a lot and I hope it will help others too.
Thank you for posting this. I really enjoyed reading it, especially because it addressed my question. It helped me a lot and I hope it will help others too.
Thanks for posting such an excellent article. It helped me a lot and I love the subject matter.
You helped me a lot with this post. I love the subject and I hope you continue to write excellent articles like this.
Thank you for your articles. I find them very helpful. Could you help me with something?
It would be nice to know more about that. Your articles have always been helpful to me. Thank you!
Thank you for your help. I must say you’ve been really helpful to me.
Dude these articles are great. They helped me a lot.
Dude these articles are amazing. They helped me a lot.
Your articles are extremely helpful to me. May I ask for more information?
Thank you for posting such a wonderful article. It helped me a lot and I adore the topic.
Your articles are extremely helpful to me. Please provide more information!
May I request more information on the matter?
Thank you for your articles. I find them very helpful. Could you help me with something?
The articles you write help me a lot and I like the topic
Your articles are very helpful to me. May I request more information?
Thank you for your articles. They are very helpful to me. Can you help me with something?
Excellent web site. Lots of useful info here. I’m sending it to a few pals ans additionally sharing in delicious. And certainly, thanks for your effort!
I enjoyed reading your piece and it provided me with a lot of value.
May I have information on the topic of your article?
You’ve been a great aid to me. You’re welcome!
You really helped me by writing this article. I like the subject too.
You’ve been really helpful to me. Thank you!
How do I find out more?
I always find your articles very helpful. Thank you!
you are really a good webmaster. The web site loading speed is amazing. It seems that you’re doing any unique trick. Also, The contents are masterpiece. you’ve done a excellent job on this topic!
You helped me a lot. These articles are really helpful dude.
You’ve been terrific to me. Thank you!
What is it about? I have some questions dude.
Thanks for your post, it helped me a lot. It helped me in my situation and hopefully it can help others too.
Please provide me with more details on the topic
Thanks for the help
You helped me a lot with this post. I love the subject and I hope you continue to write excellent articles like this.
You’ve been a big help to me. Thank you!
Thank you for your post. I really enjoyed reading it, especially because it addressed my issue. It helped me a lot and I hope it will also help others.
Thank you for your post. I really enjoyed reading it, especially because it addressed my issue. It helped me a lot and I hope it will help others too.
I enjoyed reading your piece and it provided me with a lot of value.
Please tell me more about this. May I ask you a question?
Your articles are incredibly helpful to me. Thank you! May I request more information?
Thank you for your articles. They are very helpful to me. Can you help me with something?
I enjoyed reading your piece and it provided me with a lot of value.
Dude these articles have been really helpful to me. They really helped me out.
Thank you for writing such an excellent article, it helped me out a lot and I love studying this topic.
Thank you for providing me with these article examples. May I ask you a question?
Thank you for providing me with these article examples. May I ask you a question?
Thank you for your post. I liked reading it because it addressed my issue. It helped me a lot and I hope it will help others too.
Thanks for posting such an excellent article. It helped me a lot and I love the subject matter.
magnificent points altogether, you just gained a new reader. What would you recommend in regards to your post that you made some days ago? Any positive?
I adore reading through and I think this website got some really utilitarian stuff on it! .
Hi there! I could have sworn Iíve been to this blog before but after looking at some of the articles I realized itís new to me. Anyways, Iím definitely delighted I discovered it and Iíll be book-marking it and checking back often!
Hello, i think that i saw you visited my site thus i came to “return the favor”.I am attempting to find things to improve my website!I
suppose its ok to use some of your ideas!!
It’s remarkable to visit this web page and reading the views
of all friends on the topic of this post, while I am also
zealous of getting know-how.
I have read so many posts about the blogger lovers but this post is really a pleasant paragraph, keep it up.
Awesome post.
Greetings! This is my first visit to your blog!
We are a collection of volunteers and starting a new project
in a community in the same niche. Your blog provided us beneficial information to work on. You
have done a marvellous job!
Excellent beat ! I would like to apprentice at the same time as you amend your site, how could i subscribe for
a blog web site? The account helped me a applicable deal.
I were tiny bit familiar of this your broadcast provided vivid clear concept
There is definately a lot to learn about this issue.
I like all of the points you made.
Thanks on your marvelous posting! I really enjoyed reading it, you are a great author.I
will be sure to bookmark your blog and will eventually come
back later on. I want to encourage you to continue your
great work, have a nice afternoon!
We absolutely love your blog and find most of your post’s
to be what precisely I’m looking for. Would you offer
guest writers to write content for you? I wouldn’t mind composing a post or elaborating on most of the subjects you write
regarding here. Again, awesome weblog!
For hottest information you have to go to see web and on web I
found this web page as a best site for newest updates.
whoah this weblog is excellent i like reading your
articles. Keep up the good work! You understand, a lot of individuals are hunting round
for this information, you could aid them greatly.
whoah this blog is wonderful i like studying your articles.
Keep up the great work! You understand, many persons are searching around for this information, you could aid
them greatly.
Pingback: Central Vs Distributed Version Control System » Dezlearn » Learn IT Easy